How to Delete Section Break in Word: A Comprehensive Guide
Working with Microsoft Word can be a smooth experience until you encounter those pesky section breaks that mess up your formatting. Whether you’re creating a resume, a newsletter, or a long report, knowing how to delete section break in word can save you hours of frustration. In this detailed guide, we’ll walk you through everything you need to know—from understanding what section breaks are, why you might need to delete them, to step-by-step instructions for removing them on both Windows and Mac platforms. We’ve packed this article with practical tips, external resources, and images to help you master your document formatting with ease.
I. Introduction
Microsoft Word is an incredibly powerful tool for creating professional documents. One of its key features is the ability to break your document into sections, which allows for different formatting styles (such as margins, headers, footers, and page orientations) within the same file. However, there are instances when these section breaks can become more of a hindrance than a help. If you’ve ever wondered how to delete section break in word without disrupting your entire document’s layout, this guide is here to help.
In this blog post, we’ll explore:
- What section breaks are and how they differ from other types of breaks.
- Reasons why you might want to delete them.
- Detailed, step-by-step methods for removing section breaks.
- Best practices to ensure your document’s formatting remains intact.
For additional insights, check out Microsoft’s official support page.
II. Understanding Section Breaks
What Are Section Breaks?
Section breaks in Word are invisible markers that split your document into different parts. Unlike page breaks, which simply move the content to the next page, section breaks allow you to apply different formatting options to different parts of your document. For example, you might want to have one section in portrait mode and another in landscape mode, or use different headers and footers across various sections.
There are four types of section breaks in Word:
- Next Page: Inserts a section break and starts the new section on the next page.
- Continuous: Inserts a section break without starting a new page.
- Even Page: Starts the new section on the next even-numbered page.
- Odd Page: Starts the new section on the next odd-numbered page.
Understanding these differences is essential when troubleshooting formatting issues or when wondering how to delete section break in word without causing unwanted changes to your document layout.
Section Breaks vs. Page Breaks
While both section breaks and page breaks deal with the structure of your document, they serve different purposes:
- Page Breaks: Only move text to the next page.
- Section Breaks: Enable different formatting (like columns, margins, or headers) for different parts of your document.
This distinction is crucial, especially if you need to modify or remove these elements. Knowing how to delete section break in word will allow you to merge sections without losing your carefully set formatting.
III. Reasons to Delete Section Breaks
There are several scenarios where you might consider removing section breaks:
- Removing Unwanted Blank Pages: Sometimes section breaks can create extra blank pages at the end of your document.
- Simplifying Document Formatting: When you have too many sections, it can complicate your formatting. Consolidating sections might make your document easier to manage.
- Ensuring Consistent Formatting: Inconsistent headers, footers, or margins often occur due to misplaced section breaks. Removing these breaks can help maintain uniform formatting.
- Preparing a Document for Conversion: If you’re converting a Word document to PDF or another format, section breaks might not translate well and can disrupt the final layout.
For more insights on troubleshooting formatting issues, read this Indeed article on removing section breaks.
IV. How to Delete a Section Break in Word
When you ask yourself how to delete section break in word, there are several methods you can follow. Let’s break down these methods in a detailed, step-by-step format.
A. Preparation Steps
Before making any changes, it’s essential to:
- Save a Backup: Always save a backup copy of your document to prevent any accidental loss of formatting.
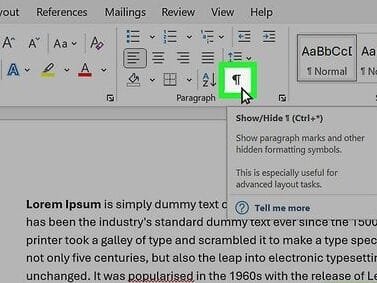
- Enable the “Show/Hide ¶” Tool: This option reveals hidden formatting marks, making it easier to locate section breaks. You can find this option in the Home tab of Word.

B. Method 1: Manual Deletion
Steps:
- Locate the Section Break: Scroll through your document and look for the section break markers. They will appear as dotted lines with the text “Section Break (Next Page)” or similar.
- Position Your Cursor: Click immediately before the section break.
- Press the Delete Key: Simply hit the delete key on your keyboard. This should remove the section break.
- Verify the Formatting: After deletion, check that the text has merged properly and that the document’s formatting remains intact.
This manual method is effective for removing individual section breaks when you need precise control over your document’s structure.
C. Method 2: Using the Find and Replace Tool
For documents with multiple section breaks, the Find and Replace tool is a fast and efficient solution.
Steps:
- Open the Replace Dialog:
- Windows: Press
Ctrl + H - Mac: Press
Command + H
- Windows: Press
- Find the Section Break:
In the “Find what:” field, type^b(this code represents a section break). - Leave Replace With Blank:
Ensure the “Replace with:” field is empty. - Replace All:
Click the “Replace All” button to remove all section breaks from your document.
By using this method, you can quickly learn how to delete section break in word across your entire document, which is especially useful when dealing with large files.
D. Method 3: Troubleshooting Deletion Issues
Sometimes, even after following the above steps, a section break might be stubborn and refuse to delete. Here are a few troubleshooting tips:
- Switch to Draft View:
Go to the View tab and select Draft. This view often makes section breaks easier to select. - Toggle Track Changes:
If Track Changes is enabled, it might prevent you from deleting section breaks. Temporarily turning it off could help. - Insert a Temporary Character:
Place a character (like “X”) immediately before the section break, then select both the character and the break to delete them together. - Use Keyboard Shortcuts:
Sometimes, a combination of keys (such asShift + Delete) works better than the normal delete key.
These tips should help you overcome any challenges and firmly answer the question of how to delete section break in word in even the most complex documents.
V. Additional Tips and Best Practices
Reapplying Formatting After Deleting a Section Break
After you remove a section break, Word may merge the formatting of the two adjacent sections. If you find that your headers, footers, or margins have changed unexpectedly, here are a few best practices:
- Reapply Formatting:
You can manually adjust the formatting after deletion. For instance, right-click the header or footer and select “Edit Header/Footer” to reset it. - Use “Link to Previous”:
In the Header & Footer Tools, ensure that the “Link to Previous” option is set correctly. This setting helps maintain consistency between sections. - Review the Document:
Always scroll through the document to verify that no unwanted formatting changes have occurred.
When to Consider Restructuring Your Document
Sometimes the best solution isn’t to delete section breaks at all but to reorganize your document:
- Combine Similar Sections:
If multiple sections share the same formatting, consider merging them. - Redesign Headers and Footers:
Adjust your document’s headers and footers to better suit a unified format. - Plan Your Layout:
Before finalizing your document, plan the structure to minimize the need for excessive section breaks.
For more in-depth advice, visit the Microsoft Community Hub.
VI. Conclusion
Managing a Word document’s structure can be tricky, especially when it comes to section breaks. Knowing how to delete section break in word is an invaluable skill that can help you maintain a professional, well-formatted document without unnecessary blank pages or formatting errors.
In this guide, we covered:
- Understanding Section Breaks: What they are, the types available, and how they differ from page breaks.
- Reasons to Delete Section Breaks: From removing unwanted pages to simplifying your document’s formatting.
- Detailed Methods to Delete Section Breaks: Including manual deletion, using the Find and Replace tool, and troubleshooting stubborn section breaks.
- Additional Tips and Best Practices: To preserve your formatting and streamline your document structure.
By following these steps and best practices, you can confidently manage your document layout and avoid the common pitfalls that lead to frustration. If you’re still having issues, consider consulting additional resources or reaching out to communities like Microsoft Answers for further assistance.
VII. Additional Resources
- Microsoft Support: Remove Section Breaks in Word
- Indeed Editorial: How To Remove Section Breaks in Word (For Windows and Mac)
- YouTube Tutorial: Delete Stubborn Section Breaks in a Word Document
- Stack Exchange Discussions: How to Remove a Section Break from Word?
Final Thoughts
Remember, mastering document formatting takes time and practice. Every Word document is different, and the method you choose may vary based on your specific needs. Whether you are wondering how to delete section break in word for a single page or an entire document, these techniques will ensure you keep control over your layout. Always back up your document before making major changes, and don’t hesitate to experiment with different views (like Draft view) to better understand your document’s structure.
We hope this guide helps you create seamless, professional documents with ease. If you have any additional tips or run into any issues, feel free to leave a comment below. Happy editing!
If you like to read more , Please check these other posts:


